10 Pie Crust Styles Every Baker Should Know

The right crust can make an ordinary pie taste unforgettable and look bakery worthy. Learn these classic and creative styles so you can match the crust to the filling and nail the texture you crave.
From simple weeknight wins to holiday showstoppers, you will have options that feel doable and impressive. Ready to make your next pie look polished and taste incredible too?
1. Single Bottom Crust
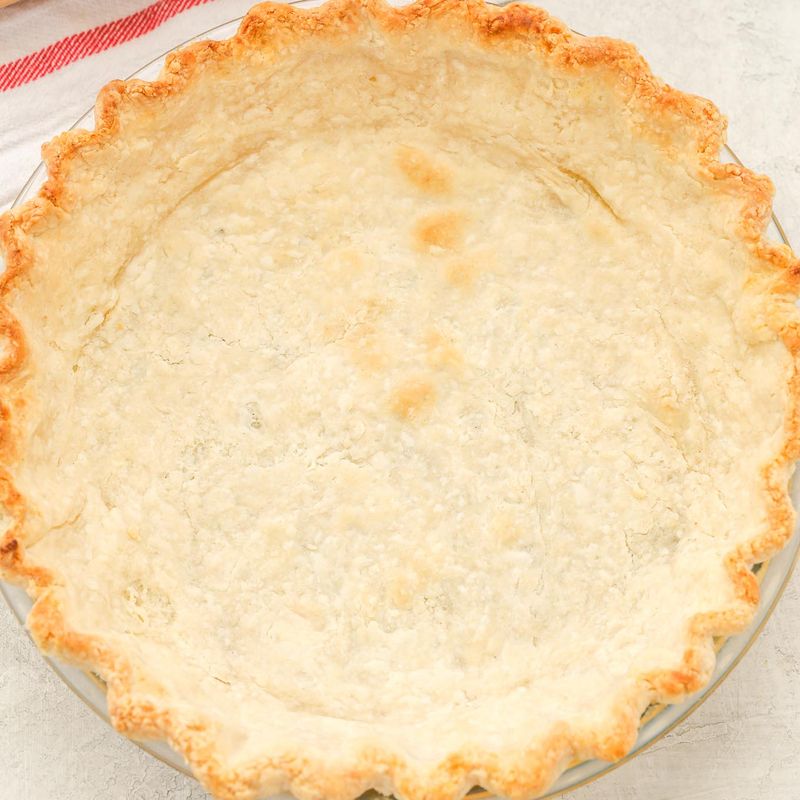
A single bottom crust is the foundation of countless pies, from silky pumpkin to classic pecan. It supports the filling, bakes evenly, and gives you clean slices without extra fuss.
Blind baking is your friend here, especially for custards and cream fillings that would soggy a raw shell.
Dock the dough, line it with parchment, and weigh it down with beans or pie weights. Parbake until set, then remove the weights to crisp the base before adding your filling.
When you want the spotlight on texture and flavor inside, this reliable crust keeps everything tasting balanced and looking polished. You will reach for it more often than you expect.
Practice once, and weeknight pies suddenly feel easy. And fun too.
2. Double Crust

A double crust seals fruit inside a cozy envelope, delivering that storybook pie experience. You roll a bottom round, fit it in the plate, pile on filling, then blanket it with a second sheet.
Steam vents help prevent bubbling, while a sugar sprinkle adds sparkle and crunch.
Brush with egg wash for gloss and better browning, and crimp the edge to seal tightly. This style excels with juicy apples, peaches, and berries that need structure to stay sliceable.
If your filling is very wet, stir in a thickener, chill the assembled pie, and bake on a preheated steel or sheet. You get bubbling fruit, tender layers, and those nostalgic aromas that make kitchens feel like home.
On chilly weekend afternoons.
3. Lattice Crust

A lattice crust weaves strips of dough into a basket pattern that shows off gleaming fruit. It lets steam escape, concentrates juices, and turns simple fillings into dramatic color displays.
Cut even strips, then alternate over and under in a relaxed rhythm that feels almost meditative.
Chill as you go, sprinkle with sugar, and watch the braidlike surface brown into crisp, flaky ridges. You can vary width for a rustic or refined look, or twist strands for playful texture.
It is a crowd pleaser because every slice carries windows of glossy fruit and irresistible crunch. Practice on scraps first, then commit to the pie once your hands feel confident.
You will love the dramatic reveal as bubbles wink through the lattice.
4. Crumb Crust

A crumb crust trades flakes for crunch, pressing cookie or cracker crumbs with butter into a sturdy shell. Graham cracker is classic, chocolate wafers are indulgent, and gingersnaps bring warm spice that flatters citrus and pumpkin.
You simply pulse, stir, press, and bake briefly to set the crust before chilling.
Because there is no rolling, this style is friendly for busy weeks or hot kitchens where butter melts fast. Press it up the sides with a measuring cup for sharp lines that feel bakery made.
Fill with banana cream, key lime, or cheesecake, and you will never worry about soggy bottoms. A pinch of salt and a whisper of cinnamon make the flavors pop.
Try toasted crumbs, too. For depth.
5. Press-In Pastry Crust
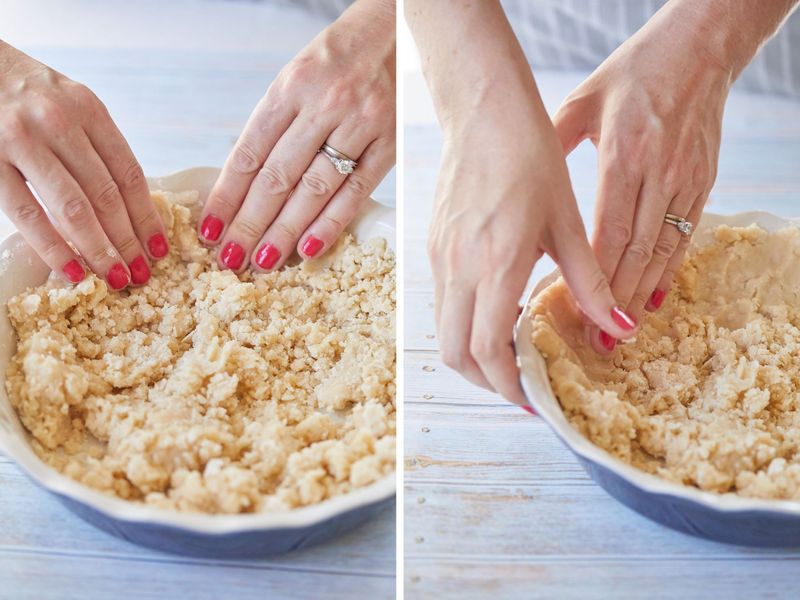
Press-in pastry skips the rolling pin and invites you to mold dough directly into the plate. It is forgiving, fast, and great for rustic pies where a few fingerprints read as charm.
Use a soft dough enriched with oil or melted butter so it presses without cracking.
Work from center outward, keeping the thickness even, and reinforce the rim with an extra pinch. Chill before baking to relax gluten and lock the shape, then parbake if your filling is very wet.
You get homemade character with less stress, perfect for nights when pie sounds right now. Dust your fingers with flour to prevent sticking, and patch any gaps with small pieces.
Nobody minds a few charming seams at the table.
6. Fluted Edge Crust

A fluted edge turns a plain pie into something dressed and dignified with just your fingers. Use one hand to pinch the rim outward while the other presses between to form waves.
Repeat around the circle, keeping the pattern even and the dough chilled so it holds.
This edge works on single, double, or lattice pies, and it welcomes a sugar sprinkle before baking. Fluting protects the filling from spills and gives your slices a dependable handhold.
Once you learn the motion, the finish looks fancy even when the process feels delightfully simple. If the rim tears, smear a little water and smooth it back together.
Then chill again before the oven for sharper, taller edges. They will impress everyone.
7. Fork-Crimped Crust

Fork crimping is the edge style you can do even on your first pie, no tools required. After fitting the dough, simply press the tines of a fork around the rim to seal.
The result is neat, uniform, and practical for pot pies, hand pies, and quick bakes.
Dip the fork in flour so it does not stick, and work with chilled dough for clean marks. You can crimp straight, angle slightly, or alternate directions for a chevron effect.
It is fast, friendly, and reassuring when you want tidy edges without fussing over technique. Press again after a few minutes of chilling to reinforce the seal before baking.
Your pies will slice cleaner, and the juices will mostly stay put.
8. Freeform Galette Crust
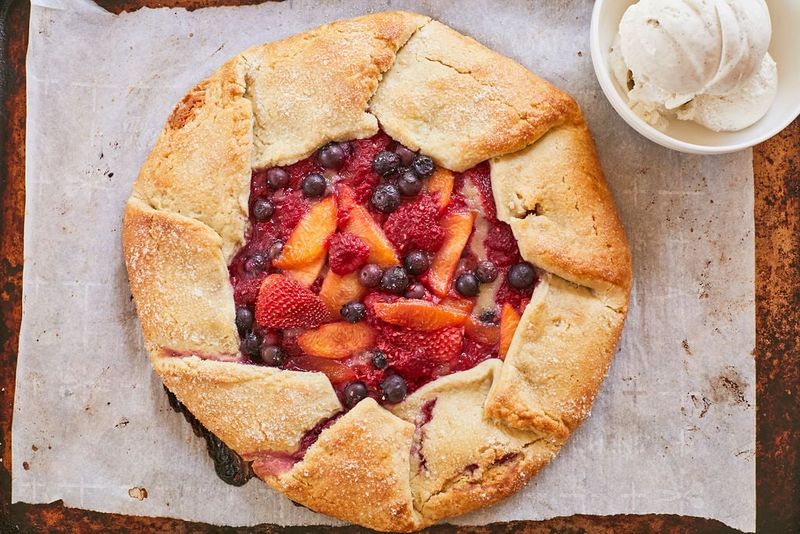
A freeform galette gives you pie flavor without a pan, perfect for relaxed baking and rustic charm. Roll the dough into a rough circle, pile fruit in the center, then fold edges up to cuddle the filling.
No crimping required, and the exposed center bubbles and caramelizes dramatically.
Brush with egg wash, sprinkle with sugar, and bake on parchment for easy transfer. Galettes are forgiving of imperfect doughs, slightly juicy fillings, and last minute inspiration.
You get crisp edges, a tender base, and a showy center that practically photographs itself. Serve warm with ice cream, creme fraiche, or whipped cream for an easy finish.
You will feel accomplished in under an hour, dishes minimal. And the house smells amazing tonight.
9. Puff Pastry Topped Crust
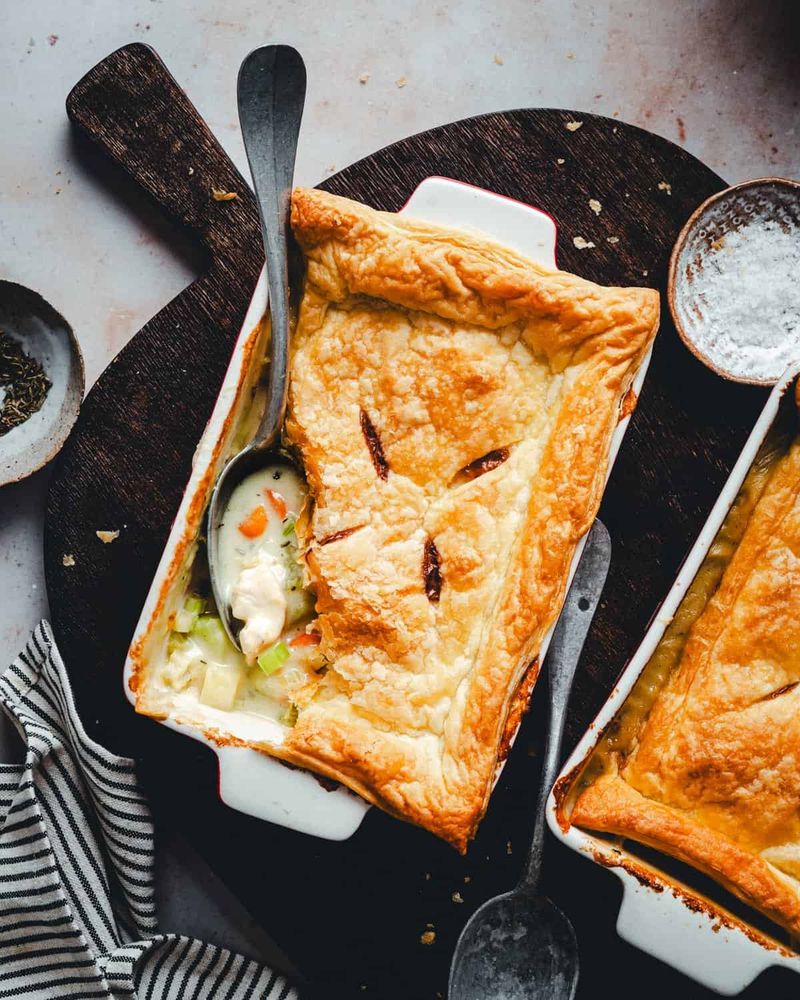
Puff pastry as a pie top brings towering layers and crisp shatter with minimal effort. It is terrific for chicken pot pies, skillet fruit bakes, and any filling that appreciates drama.
Keep the pastry cold, cut a few vents, and let it relax before baking to reduce shrinkage.
Bake on high heat so the layers puff, then drop the temperature to finish the center. Brush with egg wash or cream, sprinkle flaky salt or sugar, and enjoy the golden blistered surface.
You get bakery vibes fast, plus a playful contrast when the filling below is silky. Use an all butter brand for the best flavor and lift, and keep a spare sheet in the freezer.
It saves dinner. And dessert.
10. Decorative Cutout Crust

Decorative cutouts let you design a pie top like confetti, wreaths, or constellations. Use small cookie cutters, or carve shapes with a knife, then layer them over the filling.
Overlap pieces slightly for dimension, and brush with egg wash so everything seals and shines.
Leaves suit fall, stars sparkle in winter, and flowers sing for spring berries or lemon. You control coverage, from airy scatter to near solid top, which changes bake time and texture.
It is an easy way to personalize pies for birthdays and holidays without fussy techniques. Chill the assembled design before baking so the edges stay sharp and defined.
Guests notice the care, and you still get plenty of delicious, peeking filling. Everyone asks how.
Exactly.